Showing posts with label Stampin' Up. Show all posts

Wednesday, 23 May 2018

What's On Your Workdesk? Wednesday #468

It's the 9th anniversary of WOYWW this week. Can you believe it? 9 years of sharing our work spaces and little glimpses of our lives.

If you were here last week you would have seen the card samples from my most recent class. I always have extra 'Blue Peter' bits to make demonstrating flow more smoothly. Sometimes I make them up into more cards for my own use, when I get home, and sometimes they just get flung in a box.

This time I did something different.....


My first 12x12" scrapbook page in a very long time. I followed a sketch by the talented Laura Rumble and scrapped a picture of my girl on her 11th birthday. She turned 19 at the weekend!

I used up the leftovers.....


.....and added a couple of extra bits, like this stamped vellum circle.....


.....and this tab, to bring the pink across to the other side of the page.


I even managed to find a use for the tiny cut out heart. Did you spot it?

I'm linking up with the rest of the Deskers this morning, with grateful thanks to Julia who brought us all together.

Wednesday, 21 March 2018

What's On Your Workdesk? Wednesday #459

Well hello there! Long time, no see.

I didn't have much inclination to blog at the end of last year, for various reasons, all far too dull to go into here. I thought I'd make a fresh start in the New Year. That didn't happen, clearly. Here we are at the beginning of Spring and that seems to have given me the nudge I needed.

As I type this, my kitchen table is full of the contents of my larder cupboard so there will be no crafting happening there today. Instead I'll share with you a couple of things I made with these adorable panda stamps.


If you know me, you'll know I don't really do cute, but I couldn't resist these little chaps. I've made several projects using them, for both birthdays and Valentine's Day, but these are the only ones I've actually got round to taking photos of so far.

I'm looking forward to popping in on a few deskers while I drink my afternoon coffee. Happy Wednesday everyone!

Thursday, 8 December 2016

What's On Your Workdesk? Wednesday #392

Wednesday huh? I took the photo on Tuesday and I'm blogging it on Thursday. Ah well, it's been one of those weeks, which you'll already know if you were here on Monday.


I had a class yesterday and a laptop that refused to recognise the internet router. I seem to have fixed the issue now, more by luck than judgement, so here I am a day late.

We used that cute little moose to adorn a gift card holder, similar to this one that I wrote a tutorial for a while back. Santa made his appearance on an interactive card for kids, big and little. I'll share that at the weekend.

Joining in with Julia and the Deskers, fashionably late.

Wednesday, 16 November 2016

What's On Your Workdesk? Wednesday #389

Those four weeks flew by. I don't seem to have much time for my poor neglected blog these days. I taught a class this morning and snapped the contents of the kitchen table, once I'd unloaded the car. The tools of my trade.


I've had two new ladies join the group in the last couple of months. The challenge is to build up their skills, beginning with the basics, but keep the projects interesting for those who have been coming several years. Today, that was a fairly simple box to hold four tealights. The lid lifts to reveal the contents.....


.....and the drawer slides out to access them.


The finished box makes a sweet little gift. That's it from me today. Linking up with Julia and the Deskers. I'm about to head out and pick up my girl. I'll be round to visit after dinner. Happy Wednesday.

Saturday, 1 October 2016

Stampin' on Saturday ~ Penned and Painted

It's World Card Making Day today, so what else to do but share a card with you.


Another design using the Penned and Painted set from Wednesday's post. This time just the outline stamps for the background.....


.....with a three layered flower fussy cut and added on top.

I'll be putting an order in tomorrow (Sunday) evening. Shout if you *need* anything.

Wednesday, 1 June 2016

What's On Your Workdesk? Wednesday #365

It's been a busy kitchen table in the past couple of days. I'm getting ready for my catalogue launch party on Friday and I had a class this morning.


Here I'm using the Balloon Celebration set. I always like to find a way to get the less obvious stamps off the backing sheet. The circular designs were ideal for making a pattern on my card stock before folding it up into a box....


Linking up with the Deskers again today, ably hosted by Jan for the time being. We're all rooting for you Julia and wishing you a speedy recovery.

Saturday, 6 February 2016

Stampin' on Saturday ~ The Sky's the Limit

This week's class was based around the Sky is the Limit stamp set. We made three cards, one of which I shared on Wednesday*.


I created the background by using a splotch, from Gorgeous Grunge, stamped in sky blue. I stamped the plane image and added a vapour trail, which makes the shape of a heart so I highlighted that by colouring in red. I stamped the clouds in pale grey on a scrap of card, fussy cut and stuck on with foam pads.


The second card started in exactly the same way. This time I fussy cut a second plane, which I added over the first with foam pads, to give a bit of dimension. I left the vapour trail as it was. Stamped the sentiment onto a strip of card and cut a banner end. I then added another smaller banner to balance the composition.

The banner strip was a little longer than required and I meant to adhere it with the excess hanging over the edge so that I could trim it off, but I completely forgot!

*I'm writing a tutorial for that circular spinner card, but the photos will have to wait until we get some sunshine. Hoping that won't be too long. Have a lovely weekend.

Sunday, 6 September 2015

Stampin' on Sunday ~ Butterfly Basics

It was "Back to School" last week, for me if not the children. The first classes of the new term. I decided to use the same set of stamps as I had in the last class of the Summer term. I like to show how versatile a set can be if you give it a little thought.


The mesh design, a postmark and that lovely sentiment from the Butterfly Basics set. Some speckling from Gorgeous Grunge and the intricate butterfly die, layered with a little punched one, to finish off.


Here I added my favourite Hardwood background stamp and punched out some hexagon apertures for that mesh to peep through. A different sentiment and some punched butterflies raised on foam pads for dimension.


This time I stamped the mesh and speckles onto a piece of card so that I could punch the hexagons out and add on top of the background mat. I thought this would make a good male card. It could be adapted to any colour scheme, but this is one I never grow tired of.

I'll share the final card from that class (and the story of the unexpected shed) on Wednesday. It's a glorious day here. Hope the sun is shining with you too.

Wednesday, 8 July 2015

What's On Your Workdesk? Wednesday #318

It's been almost a month since I last joined in with Julia's weekly peek at desks around the world. Really? I didn't believe it either, but my blog archive tells me so.


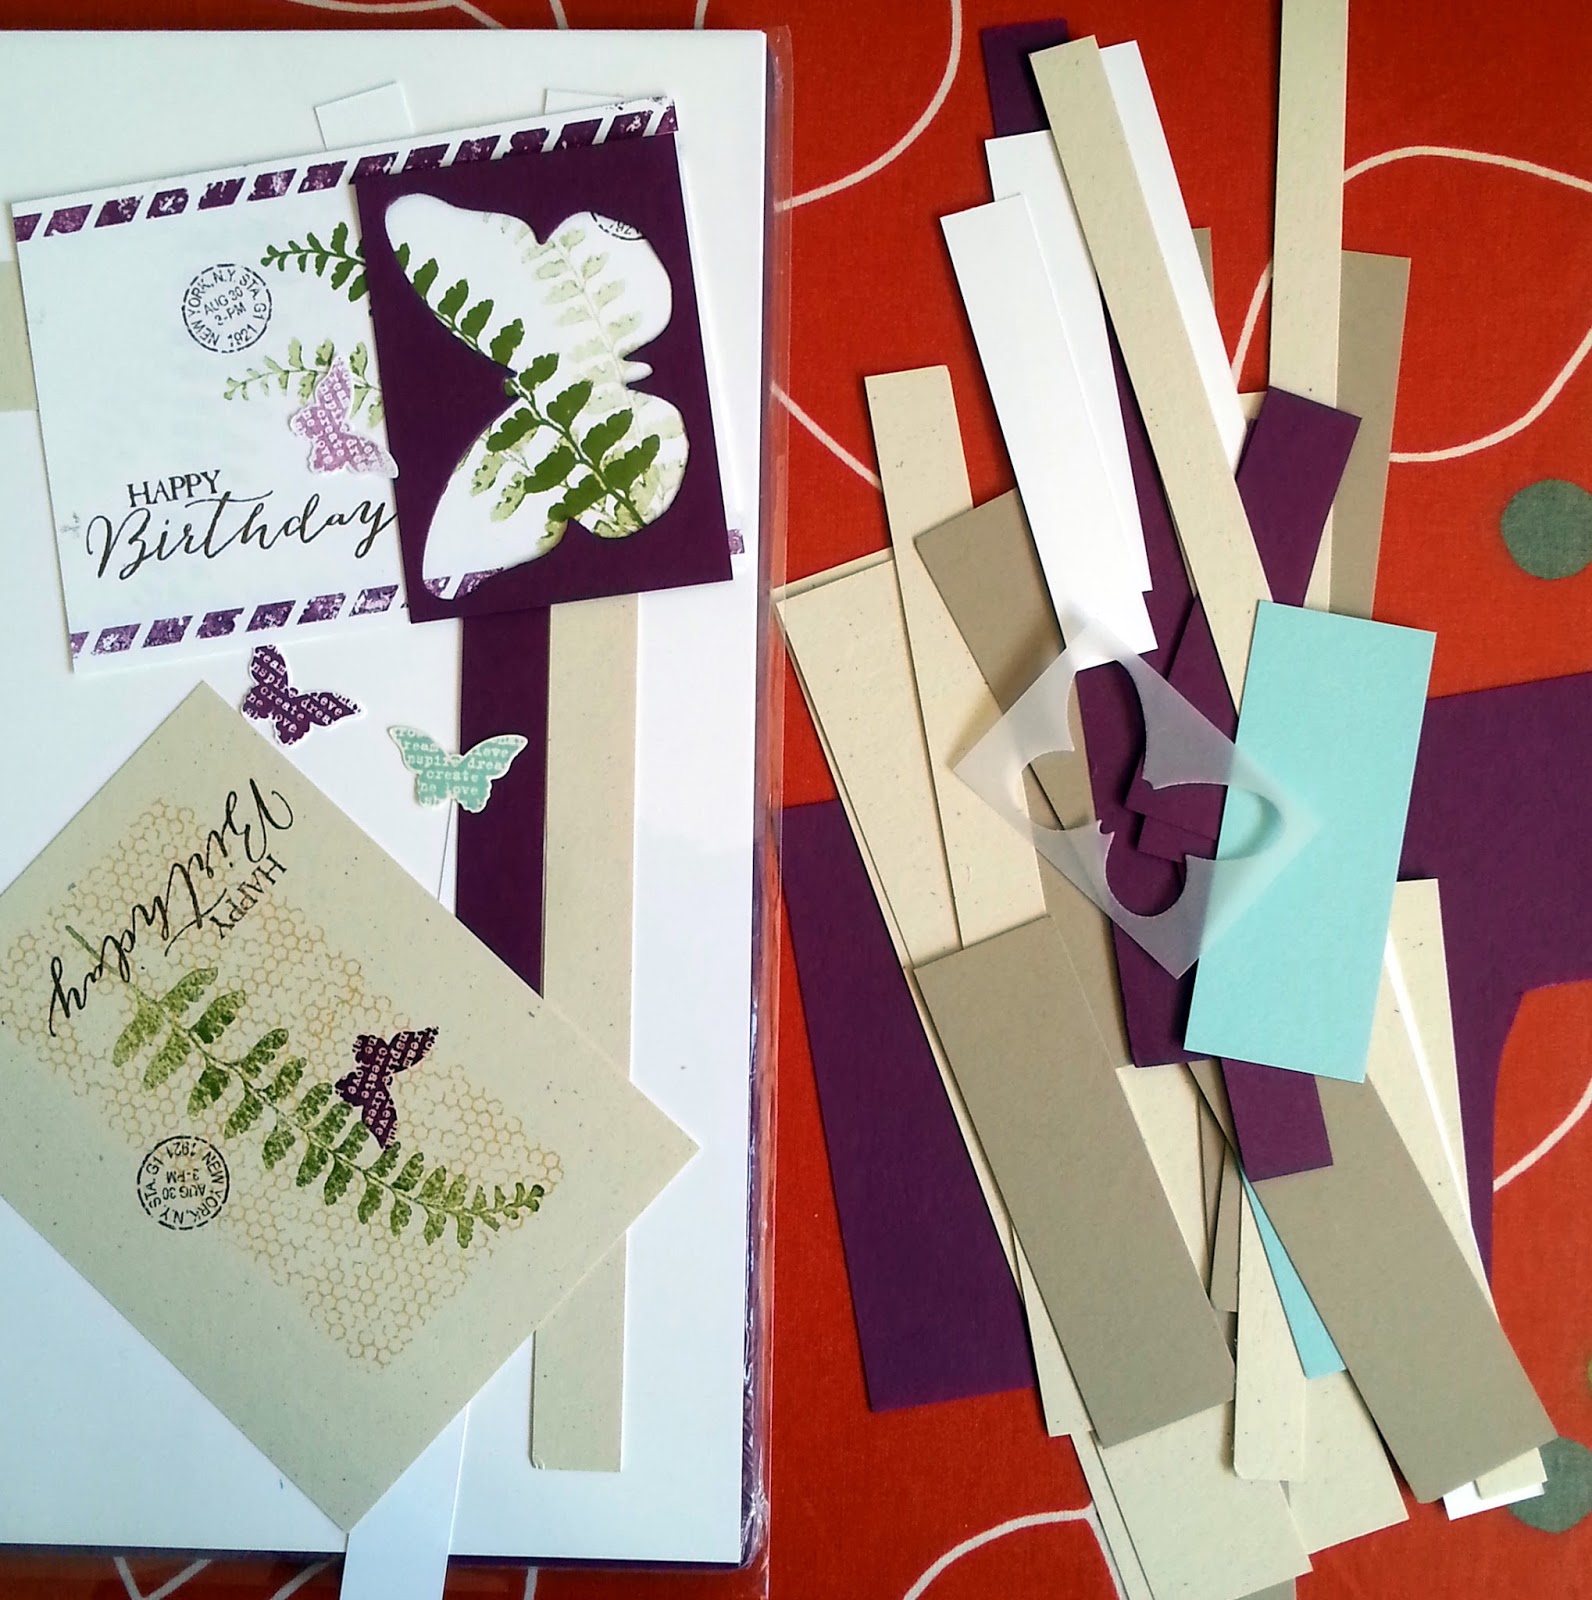
This is what my kitchen table looked like yesterday afternoon. Kitting for class this morning. My last until September.  A pile of off cuts and a couple of rejects.


One of the finished cards. I'll share the rest later in the week. My little photo shoot was cut short when my brother dropped in for coffee, followed by my nephew a couple of hours later and they've only just left. I do love a surprise visit.

I really should be cooking the dinner right now, so short and sweet it is today. Happy Wednesday.

Saturday, 22 November 2014

Stampin’ Up Saturday ~ Holiday Home

On Wednesday you would have seen the component parts for this card on my kitchen table and here they are all assembled.

2014-11-22

I find it very tricky to photograph these screen cards to give a good view. I’ve put together a little collage so that you can see it open as well as closed and the inside stamping, which is only partly visible on the outside. Probably a little more work than you want for a Christmas card, if you have a lot to make.

IMG_20141122_145742

Onto something that is easy to mass produce at this time of year. Some basic one layer stamping, using two shades of brown, with a die cut for some dimension. I added the candy cane twine for a hint of colour and the touchability* factor.

I’m loving the versatility of this little house set. Sian has used it to create some Christmas cards in another non traditional colour scheme. Aren’t they great?

If you’d like to know how to make a screen card, in this simpler form, I’ll be adding the tutorial next week. Are you making cards this weekend?

*Apparently this is not a real word.

Saturday, 18 October 2014

Stampin’ Up Saturday ~ Notelet Set

If you visited on Wednesday you would have seen the panic stations preparation for this project. As last minute makes go, I’m pretty pleased with it and it was well received. The box is very easy to put together, using the envelope punch board.

IMG_20141017_134958

You’ll need an 8” square of cardstock, stamped with your choice of design. I’ve left mine blank for the photos so that you can see the score lines more easily.

20141018_162548

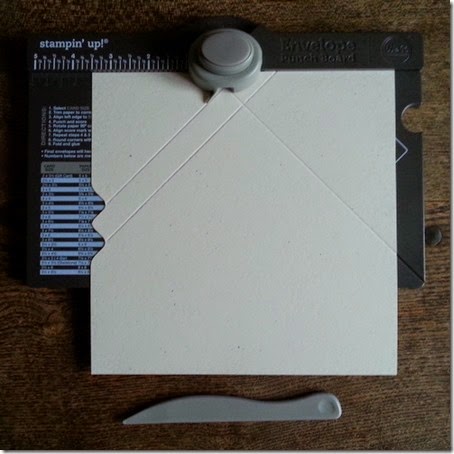
Line the left hand edge of the cardstock up at the 3 1/2” mark, punch and score. Slide the cardstock a little further to the left, lining up at the 4 1/2” mark, repeat.
20141018_162706

Turn the cardstock anticlockwise, line the score guide up with the previously scored line, punch and score. This gives a perfect right angle, which you might not achieve by lining up the edge of the card with the measurements at the top of the board.

20141018_162847

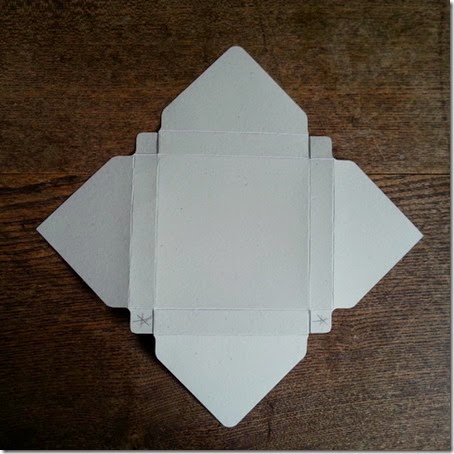
Continue to turn the cardstock anticlockwise, until all four sides are punched and scored. Lining up the score guide with the previously scored lines each time. Use the corner rounder, at the back of the board, to finish the top and bottom flaps.
20141018_145124

Cut from the first score line up to the second, at the corner squares, to form tabs.
20141018_145617

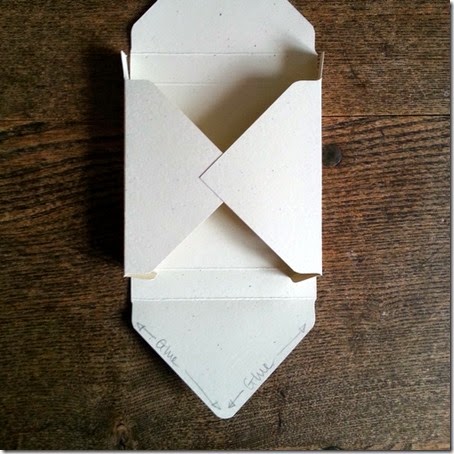
Turn over and bring the side flaps in, adhering with a small amount of glue. Add a little more glue on the inside of the bottom flap (as shown) and on the bottom tabs (marked with a star in the previous picture) and fold up to form the box.

20141018_145717

This size box will hold four 4” cards and envelopes.

IMG_20141017_134638

To hold the box closed, I added one of my “fluffy” flowers. It is raised up on foam pads, stuck only to the side and bottom flaps. The top flap tucks behind it. I stamped my cardstock to match the notelets, but you could use heavier weight scrapbook paper and substitute a scalloped layered circle to match your box.

The Envelope Punch Board is a very useful tool, not only for making envelopes to match your handmade cards, but for lots of different boxes, including these. Endless possibilities for packaging little gifts. If you make one, I’d love to see it.

Saturday, 19 July 2014

Christmas in July? Not around here.

One or two of you, clever readers, spotted the Ornament dies on my kitchen table on Wednesday. Not much of a jump to assume I was doing a little seasonal crafting, but no. I needed some balloons to decorate a Card in a Box and was originally planning to use an oval punch. But mine isn’t quite the right shape and I wasn’t happy with them. I thought I’d use circle punches instead…..and then…..

IMG_20140716_161950

I had a brain wave…..Ornament dies! Turned upside down they gave me a ‘neck’ to tie the string around. Perfect. If you’re a regular, you’ll know I like to get plenty of mileage out of my craft supplies. There’s something especially satisfying about alternative uses for Christmas themed products, don’t you think? I stamped the balloons with chevron designs and pulled out my old favourite, Gorgeous Grunge, for the panels. Added a Frame to the front for a sentiment and I was done. I left the largest balloon at the back plain so that the card could be personalised.

IMG_20140716_160442

One of the ladies who comes to my class had requested a Shaker card. I’d never made one before so I watched a few Youtube videos on the construction and then created one in my own style. As you can probably tell, I used what was already out on my desk for the previous card. Not that I’m lazy or anything.

Gorgeous Grunge for that ink splattered look and the wonderful Positively Chevron background stamp. I punched out lots of small circles, from the scraps leftover after die cutting the balloons, and added a pinch of sequins for a bit of sparkle.

Colours used were Pacific Point, Pool Party and Whisper White, with the addition of Daffodil Delight for the Card in a Box. I was thinking of putting together a tutorial for the latter. There are lots online already, I know, but I do mine a little differently so that they fit a standard 6” x 6” (15cm) envelope. If you’d be interested in that, just let me know in the comments.

We’ve had some spectacular storms here, the last couple of nights and I love to watch them, as long as I’m safely tucked up indoors! I’m hoping for a quiet one tonight though. Enjoy the rest of your weekend.

Wednesday, 17 July 2013

What’s On Your Workdesk Wednesday? #215

I should probably rename these weekly sneaks at my work space. “What’s on your kitchen table Tuesday?” Doesn’t quite have the same ring to it though.

P1020869

This is what was happening yesterday morning. I need a bunch of Thank you cards, so I’m taking one of the designs from last week’s class and running with it.

P1020851

Embossing, stamping, die-cutting, paper piercing, inked edges. It’s all there. A touch of kraft and that script stamp. They get in everywhere. Originally, I just had the three colours in mind, but when I put it together it was lacking something, in my eyes. I added that tiny flower in blue instead of cream or kraft and it works for me.

The card I was fiddling with last week got finished in time. I know there’s not much time for clicking on links on Wednesdays, but if you’re so inclined, it’s here.

I’m joining Julia and all the other deskers today. How about you?

Saturday, 6 April 2013

Stampin’ Up Saturday ~ Everything Eleanor #2

Last week’s cards were both very floral. This time I wanted to show a different style of card, using a stamp from the same set.

P1020601

I stamped the round frame onto the green card, before embossing it with the Lacy Brocade folder. I then used the same stamp to make a border along the top and bottom of my base card. The Stamp-a-ma-jig came in very handy for lining it up.

P1020603

The green panel was added on top and finished with a butterfly, embellished with pearls, and a sentiment on a banner strip. I realised, after photographing, that the stamping of the sentiment had left a shadow. Completely intentional of course!

P1020602

Other than the stem for the flowers, these are the rest of the stamps that I didn’t show last week. The cardstock colours I’ve used here are Blushing Bride and Pear Pizzazz which, I’m very happy to say, are making a return in the next catalogue. I’m not really a pink person but I do love that shade, it’s perfect.

If you have a favourite colour of inkpad, that you can’t live without, make sure you order a re-inker for it, while stocks last. If you’d like any more information, on anything I’ve mentioned, please contact me angelfishcrafts{at}gmail{dot}com

I’ll be back tomorrow for Storytelling Sunday: Pick Your Precious. Are you joining in this month? First timers, occasional participants and seasoned regulars, Sian welcomes anyone with a tale to tell. Maybe I’ll see you there.

Saturday, 30 March 2013

Stampin’ Up Saturday ~ Everything Eleanor

This is one of the first sets I bought when I became a Stampin’ Up demonstrator and still one of my most often used. There are a lot of different stamps within the set, which all co-ordinate perfectly to make a wide variety of card designs.

P1020585

I can’t claim full credit for this design as I saw something similar a while ago, but can’t remember where. I liked the idea of the label stamped partly off the page. I’ve used two of the flowers, the scroll and the label to make this card. There is a third flower in the set, which can be seen on the card I shared on Wednesday.

P1020591

Pictured again here with some of the other stamps. There is a stem for the flowers, a bird and an ornate circular frame, which would make a great journalling spot on a scrapbook page. Each card uses two shades of ink and two colours of cardstock. I’ve added a sentiment from Itty Bitty Banners, cut with the matching framelits.

  • Everything Eleanor stamp set
  • Itty Bitty Banners stamp set
  • Bitty Banners Framelits
  • En Francais background stamp
  • Old Olive & Basic Grey ink
  • Crumb Cake & Soft Suede ink

Please get in touch, if you would like any more information on the products used, or you are interested in card making classes or hosting a workshop in the North Dorset area. I can be found on Facebook or at angelfishcrafts{at}gmail{dot}com.

Happy Easter everyone. I hope the sun shines on you this weekend.

Saturday, 23 March 2013

Stampin’ Up Saturday ~ Bird Builder

As promised, the card I made using the Bird Builder punch.

P1020577

I saw this beautiful card and was inspired to make a simpler version, more in keeping with my own style. I also wanted something that would be suitable for a card class, which means being able to complete in around half an hour. It’s easy to replicate, only a little patience needed, for punching and adding all those leaves.

  • Bird Builder punch
  • Small Heart punch
  • Heart framelits/nestabilities
  • Whisper White cardstock
  • Silver Glimmer Paper
  • Perfect Polka Dots embossing folder

The punch consists of a bird body, separate wing and a branch. There are so many other things that can be made with it and you know how I like to get mileage out of my craft tools. I’ll share another idea (or two) next Saturday.

In the meantime, please get in touch, if you’d like any more information on the card or the products I used. Find me on Facebook or at angelfishcrafts{at}gmail{dot}com

Sunday, 17 March 2013

Stampin’ Up Sunday ~ Perfect Postage #2

A few more cards using the postage stamp punch this week.

P1020568

Another variation on the Christmas design, I made previously, for a New Baby card. I didn’t have any pink or blue seam binding, but I did have plenty of white. I dyed a couple of lengths, with inkpads, to give a pretty good match.

P1020563

I adapted the 1st Birthday Card to make one for my niece, who was 17 yesterday. Switching the bunny for a heart (also from Perfect Postage) and the abc background for a Happy Birthday sentiment, which reminded me of a post mark.

  • Postage Stamp punch
  • 1” Square punch
  • Small Heart punch
  • Perfect Postage stamp set
  • Memorable Moments (numbers) stamp set
  • Morning Post alphabet stamp set

The Morning Post alphabet is definitely an investment purchase, at £33.95 for the clear mount (rubber) version, but it has so many possibilities. Pair it with the Postage Stamp punch at £14.25 and you can make a wide variety of cards, suitable for different occasions and the letters make great titles for scrapbook pages. 

Sale-A-Bration ends on Friday, which gives you a few more days to earn those freebies, if you place an order worth £45 or more. There are lots of great products on offer. For more details about those, or any of the products I’ve shown here today, please contact me at angelfishcrafts{at}gmail{dot}com and I’ll be happy to help.

Saturday, 9 March 2013

Stampin’ Up Saturday ~ Perfect Postage

I think of my stamps and punches as an investment and before purchasing, I always make sure I’ll be able to come up with a variety of card designs using them. The Postage Stamp punch has certainly earned its keep since I bought it.

P1020548

I’ve used it here to make a 1st Birthday card for a little boy. There’s a prettied up girl version in pink, but that has a recipient in mind and her Mummy sometimes reads my blog. The elements could easily be switched to make it a welcome baby card, birth announcement or christening/naming ceremony card.

P1020547

If you’re a regular visitor to Stampin’ Up Saturday then you’ll probably recognise this design. I like to get mileage out of them! I did something very similar for Christmas cards last year. I made this in red for a Valentine card and changed to a neutral palette, with a touch of gold, for a wedding card.

  • Postage Stamp punch
  • 1” Square punch
  • Small Heart punch
  • Perfect Postage stamp set
  • Memorable Moments (numbers) stamp set
  • Morning Post alphabet stamp set

Sale-A-Bration is running for a couple more weeks, still time to earn those freebies. Spend £45 and choose from a variety of stamp sets and other products on offer. For more details about that, or any of the products I’ve shown here today, please contact me at angelfishcrafts{at}gmail{dot}com and I’ll be happy to help.

PS I’m having a few technical difficulties getting the new blog up and running. I’ve posted here, rather than miss another Saturday.

Saturday, 9 February 2013

Stampin’ Up Saturday ~ Punches Galore!

I designed this little project to make in my card class a couple of weeks ago. It was only when I came to pack my supplies, that I realised just how many punches I had used. I love the way they all work together so well, when layered up like this. I chose some patterned paper and picked the ink and card colours to match.

P1020506

The sides were cut using the Two Tags die and than a rectangle of card was scored and folded to complete the basic gift bag. A piece of paper glued around it and the layered embellishment added on the front. It would work on a scrap book page too. A narrow strip of card for the handle, glued inside and secured with brads.

P1020504

The matching card is very similar to one I’ve shared before, with a few more layers and a slight change of colour scheme. Making use of that wonderful honeycomb effect embossing folder and the beautiful butterfly stamps and punches.

  • Two Tags Bigz die
  • Papillon Potpourri stamp set
  • Elegant and Bitty Butterfly punches
  • Honeycomb embossing folder
  • Perfect Polka Dots embossing folder
  • Four Frames stamp set
  • Decorative Label punch
  • Large Oval punch
  • Scallop Oval punch

Why not take advantage of Sale-A-Bration to add to your own collection of punches? The Decorative Label with the Large and Scallop Oval would give you a qualifying purchase. Alternatively the Papillon Potpourri stamp set and two matching punches would also entitle you to pick a free gift from the leaflet.

If you’d like to find out more, then don’t hesitate to contact me at the usual place angelfishcrafts{at}gmail{dot}com

I’ve decided that from next month I will have a separate blog for Stampin’ Up and my paper craft classes. There is much more that I want to share and I don’t feel comfortable trying to build my business on this blog. I want to continue posting here in the spirit in which I started Staring at the Sea.  For creativity and community.

Next week I’ll have another gift bag for you, using the other tag on the Two Tags die and of course a matching card. Hope to see you then.

PS A couple of people said they would be interested in a tutorial for the little box I shared a few weeks ago and I’m working on that. Also instructions for today’s gift bag and the one for next week. I’ll run them as a series throughout March.

Sunday, 27 January 2013

Stampin’ Up Sunday ~ Papillon Potpourri #2

Remember these cards from a couple of weeks ago? I made them using two of the larger butterfly stamps from Papillon Potpourri and a matching punch . There are also three smaller butterflies in the set and I’ve used one of them here to layer up.

P1020499

There are also a couple of sneak peeks from the upcoming Spring catalogue, which launches on the 1st of February. Another butterfly punch to match those smaller images and an embossing folder to make that lovely honeycomb background.

  • Papillon Potpourri stamp set
  • Elegant Butterfly punch
  • Bitty Butterfly punch (coming soon)
  • Four Frames
  • Decorative Label punch
  • Perfect Polka Dots folder
  • Honeycomb folder (coming soon)
  • Crumb Cake, Pool Party and Very Vanilla cardstock
  • Lucky Limeade and Primrose Petals inkpads

If you would like a copy of the new Spring/Summer just drop me a line at angelfishcrafts{at}gmail{dot}com   I’ll be sending them out this week.