Showing posts with label gift boxes. Show all posts

Wednesday, 16 May 2018

What's On Your Workdesk? Wednesday #467

Another Wednesday rolls around and I actually have a desk shot this week. Admittedly it's from just before the National Scrapbooking Day shenanigans started! I was prepping for a class and making a few more PL cards for my 100 Day Project.


We had a new lady join us and she hadn't dabbled in paper crafting before. I kept the gift box simple and planned the other projects to include the use of punches and the Big Shot as well as basic stamping. I also need to keep things interesting for the ladies who've been coming along for several years. It's a fine balance.


One card made with a repeated motif to get used to the pressure required and one with a large background stamp used face up, bringing ink to stamp.


The square cut from the frame on this card was used on the other one. Waste not, want not!

Linking up with Julia and the Deskers this morning. Happy Wednesday.

Wednesday, 21 March 2018

What's On Your Workdesk? Wednesday #459

Well hello there! Long time, no see.

I didn't have much inclination to blog at the end of last year, for various reasons, all far too dull to go into here. I thought I'd make a fresh start in the New Year. That didn't happen, clearly. Here we are at the beginning of Spring and that seems to have given me the nudge I needed.

As I type this, my kitchen table is full of the contents of my larder cupboard so there will be no crafting happening there today. Instead I'll share with you a couple of things I made with these adorable panda stamps.


If you know me, you'll know I don't really do cute, but I couldn't resist these little chaps. I've made several projects using them, for both birthdays and Valentine's Day, but these are the only ones I've actually got round to taking photos of so far.

I'm looking forward to popping in on a few deskers while I drink my afternoon coffee. Happy Wednesday everyone!

Wednesday, 16 November 2016

What's On Your Workdesk? Wednesday #389

Those four weeks flew by. I don't seem to have much time for my poor neglected blog these days. I taught a class this morning and snapped the contents of the kitchen table, once I'd unloaded the car. The tools of my trade.


I've had two new ladies join the group in the last couple of months. The challenge is to build up their skills, beginning with the basics, but keep the projects interesting for those who have been coming several years. Today, that was a fairly simple box to hold four tealights. The lid lifts to reveal the contents.....


.....and the drawer slides out to access them.


The finished box makes a sweet little gift. That's it from me today. Linking up with Julia and the Deskers. I'm about to head out and pick up my girl. I'll be round to visit after dinner. Happy Wednesday.

Wednesday, 1 June 2016

What's On Your Workdesk? Wednesday #365

It's been a busy kitchen table in the past couple of days. I'm getting ready for my catalogue launch party on Friday and I had a class this morning.


Here I'm using the Balloon Celebration set. I always like to find a way to get the less obvious stamps off the backing sheet. The circular designs were ideal for making a pattern on my card stock before folding it up into a box....


Linking up with the Deskers again today, ably hosted by Jan for the time being. We're all rooting for you Julia and wishing you a speedy recovery.

Wednesday, 27 April 2016

What's On Your Workdesk? Wednesday #360

Another week has sneaked past me and the kitchen table hasn't seen any action since my last class. We made a box, which you saw the beginnings of last time.


And a couple of cards.....


.....continuing the theme.


Linking up with Julia and the Deskers on this bright and frosty morning. I had to defrost my windscreen today. Not what I expected at the tail end of April.

Wednesday, 11 November 2015

What's On Your Workdesk? Wednesday #336

What's happening at the kitchen table today? Quite a bit, as it happens.


I've just finished kitting for a weekend workshop. A fairly new venture for me. I get quite a lot of enquiries from people who can't make it to my day time sessions, during the week, as they work full time. If they are willing to host, and have enough friends who are interested, then I take the class to them. It's a pretty good solution.


The cards you've seen before, if you visited last week. Here's a closer look at the gift box. I did a tutorial for it earlier this year, if you fancy making some. Very simple and you can get two from a sheet of A4 card. Patterned paper works well, as long as it's a decent weight, and saves on stamping, but that's my favourite part.

Time for a coffee and a Danish, while I visit Julia and The Deskers.

Wednesday, 5 August 2015

What's On Your Workdesk? Wednesday #322

Still no crafting happening at my kitchen table, hence my absence last Wednesday. No desk shot this week either, but I remembered something I haven't shared yet.


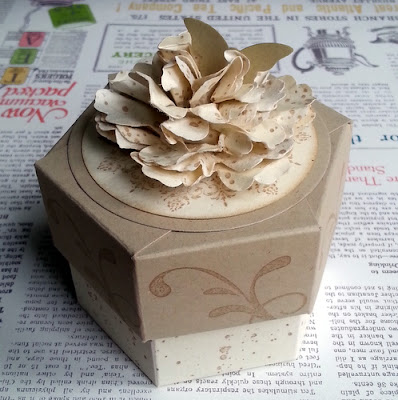
A little bit of wedding related faffing from last month. My niece and her fiancee requested money or vouchers as they already share a home and I thought it would be nice to put the cash in a little box.


Just for fun I made it hexagonal. It wasn't that difficult to figure out, but quite tricky to keep the angles even when assembling. Gluing a circle inside the base and lid kept the hexagon from elongating.


I decorated the sides with old favourites Everything Eleanor and Gorgeous Grunge. Topping it off with a layered flower and tiny gold butterfly.

I'm linking up with Julia and the desk hoppers. Maybe next week I'll have some work in progress. You never know!

PS I'm putting a Stampin' Up order in this evening, if anybody needs anything.

Saturday, 18 April 2015

Stampin’ on Saturday ~ Gift Box Tutorial

I’m back to show you my stamped panel, turned into….

IMG_20150419_130648

…..a very simple gift box.

If you’d like to make one then you’ll need:

a piece of decorated cardstock, or patterned paper* cut to 8 1/4” x 5 1/2”

a scoring tool, scissors, glue, hole punch and a length of ribbon.

IMG_20150419_131605

Starting with the long edge at the top score your card at 2, 4, 6 and 8”. Turn it clockwise so that the short edge is at the top and score at 2”. I’ve left my card plain and drawn the scoring lines on so that you can see them more clearly. Your card will already be decorated with stamps or you can use patterned paper instead.

IMG_20150419_131845

Here’s the decorated version, scored and cut, ready to fold. The panels above the horizontal score line remain intact. I’ve cut along the vertical score lines below it, to make the flaps that form the base of the box and removed the 1/4” strip, leaving a tab above to join the main part of the box. Punch a small hole in the far right panel about 1/2” from the top and another to match in the second panel from the left.

IMG_20150419_132003

Turn the piece of card over so that the blank side is facing up. Fold in the left hand panel along the first vertical score line. Put some glue on the tab and fold the right hand panel in to adhere.

IMG_20150419_132312

Once it is firmly stuck, open out into a box shape, fold the flaps under and glue to form the base. I like to keep the tab at the back left and fold in the back flap first, followed by the two sides and lastly the front flap to give a neat finish.

IMG_20150419_132539

Gently push the sides in with your fingers and squeeze the top of the front and back panels together. Thread a piece of ribbon or twine through the holes. Tie to hold the box closed and you’re done.

Let me know, if you have a go. Enjoy the rest of your weekend.

*If you are cutting from a 12” x 12” sheet of patterned paper you could make your width 8 1/2” to give you a bigger tab for gluing. I’ve made mine 8 1/4” purely because that is the width of an A4 sheet of cardstock.

Wednesday, 10 December 2014

What’s On Your Workdesk? Wednesday #288

Last Wednesday was one of those days that you just want to forget and I didn’t make it to the desk hopping fun. I managed to squeeze in a little bit of crafting yesterday and here’s the kitchen table just as the light was going.

IMG_20141209_144426

I’m making little boxes. When you lift the lid, the cut out shape reveals the four tea lights nestling inside. This version is going to be blue and white with snowflakes.

IMG_20141209_090505

This is the one we made in class. You can see the star shaped peep hole, which is underneath the lid, in the first shot. There was a card to match, but I’ve already given it away and forgot to take a photo.

IMG_20141204_181300

Finally a mini cracker treat box. Perfectly sized for a lip balm (or sweets/chocolate) and made using the ever useful Envelope Punch Board. Three more projects to come up with for next week’s class and then I’m done for the year. Just like that.

I said it yesterday, but I’ll say it again: Apologies to anyone having difficulty getting past Word Verification. I seem to be unable to turn it off. I have tried and tried. I don’t think it’s just me. It has reared its ugly head on several blogs that I visit regularly. Come on Blogger, give us a break!

Saturday, 18 October 2014

Stampin’ Up Saturday ~ Notelet Set

If you visited on Wednesday you would have seen the panic stations preparation for this project. As last minute makes go, I’m pretty pleased with it and it was well received. The box is very easy to put together, using the envelope punch board.

IMG_20141017_134958

You’ll need an 8” square of cardstock, stamped with your choice of design. I’ve left mine blank for the photos so that you can see the score lines more easily.

20141018_162548

Line the left hand edge of the cardstock up at the 3 1/2” mark, punch and score. Slide the cardstock a little further to the left, lining up at the 4 1/2” mark, repeat.

20141018_162706

Turn the cardstock anticlockwise, line the score guide up with the previously scored line, punch and score. This gives a perfect right angle, which you might not achieve by lining up the edge of the card with the measurements at the top of the board.

20141018_162847

Continue to turn the cardstock anticlockwise, until all four sides are punched and scored. Lining up the score guide with the previously scored lines each time. Use the corner rounder, at the back of the board, to finish the top and bottom flaps.

20141018_145124

Cut from the first score line up to the second, at the corner squares, to form tabs.

20141018_145617

Turn over and bring the side flaps in, adhering with a small amount of glue. Add a little more glue on the inside of the bottom flap (as shown) and on the bottom tabs (marked with a star in the previous picture) and fold up to form the box.

20141018_145717

This size box will hold four 4” cards and envelopes.

IMG_20141017_134638

To hold the box closed, I added one of my “fluffy” flowers. It is raised up on foam pads, stuck only to the side and bottom flaps. The top flap tucks behind it. I stamped my cardstock to match the notelets, but you could use heavier weight scrapbook paper and substitute a scalloped layered circle to match your box.

The Envelope Punch Board is a very useful tool, not only for making envelopes to match your handmade cards, but for lots of different boxes, including these. Endless possibilities for packaging little gifts. If you make one, I’d love to see it.

Thursday, 2 October 2014

Holiday Home

I gave you a little teaser yesterday and here’s the full reveal. Oh, how I love these tall thin houses, all in a row.

P1030536

The black and white houses are simply stamped on the background and the coloured house has been paper pieced. I stamped out five extra images. Two on white, one for the base and one for the windows and door frame. One each on bright yellow, red and pale blue, to cut apart for all the other components. This image works particularly well for the technique as it’s all straight lines.

P1030537

We used the matching dies to cut the stamped houses for our next project, much to everyone’s relief! They wouldn’t work for the piecing, as they leave a narrow border around the image. Perfect here. I’m always a fan of kraft cardstock and it’s a great base for this simple box. A strip of patterned paper, a snip of ribbon and a few punched hearts, in Cherry Cobbler, all add up to a project with a seasonal flavour. It could be used to house (no pun intended!) a small gift or as a decoration. I can picture a whole row of them on a mantelpiece, or even hanging from the tree.

I’m putting together a tutorial for the basic box and I’ll be sharing that some time during Blogtoberfest, along with one for my take on the Card in a Box theme. You thought I’d forgotten about that, didn’t you? There’s one part of the process which I’m finding tricky to show/explain, but it’ll be coming soon.

Shameless self promotion coming up. The stamp set I used is called Holiday Home and is available to order at £13.95, if anyone is interested.

We’re still enjoying the sunshine here. Hope you are too.

Wednesday, 3 September 2014

What’s On Your Workdesk Wednesday? #274

Last Wednesday my view looked like this. We were about a third of the way up Ben Nevis at the time and I was photo bombed by a dog.*

20140827_143024

This week the kitchen table is empty and there has been no time for crafting, of any kind, since we got back from Scotland. Luckily I’d prepared for my first card making class of the term before the children broke up.

IMG_20140707_124321

We made this little box. Pink and ivory with a bit of kraft coloured ink and seam binding. One of my ladies was so chuffed with hers that she’s going to make them for her daughter’s wedding favours next year. I’m pretty chuffed with that.

Today I am going school shoe shopping with my girl, once my boy gets home with his timetable for the year ahead. Fingers crossed that all is as he expects. It will be the first time he hasn’t received it two weeks ahead of the start of term. Something the school do for children on the spectrum. I’ll be holding my breath ‘til then.

If it’s actual desks you want to see, then head on over to Julia’s place. You’ll be spoilt for choice.

* Another contender for #10 in the Summertime Photography Scavenger Hunt

Wednesday, 4 June 2014

What’s On Your Workdesk Wednesday? #261

Is it really a whole week since I last blogged? Darn you exam season, for sucking the life out of me right now! Nearly there and then we can all breathe again.

P1030494

Oh look, it’s my *actual* desk. Now you can see why I’ve been showing you the kitchen table of late. This has become a dumping ground, for whatever I’ve just finished with. Class planning, card and box samples and ATC making.*

P1030491

Here’s one of today’s class offerings. Everyone is always pleased to see a masculine card among the samples. Is there anyone who doesn’t struggle with these? I love these tiny stamps with their vintage feel.

P1030481

A prettier version, made for my eldest niece, to wish her well on a year long adventure in Australia. We made this as an easel card in class and changed it up a bit to include a Happy Birthday sentiment. Why are easel cards so tricky to get a good shot of? I gave up and shared this one instead!

P1030493

And finally, a little matching gift box. The sun was out, for about five minutes, so I took my chance with the camera. That’s it from me. My girl will be home any minute. Pop over to Julia’s to see what the rest of the deskers have been up to. I’ll be round to visit this evening.

Sunday, 11 May 2014

A few thoughts on….changing it up

As some of you know I teach card making classes at our local Arts Centre and have been doing so now for about 18 months. The ladies, who come along each week, often ask me how I dream up something new every time. Well the truth is, I don’t.

Take this little box. Intended as a wedding favour, to fit this week’s theme….

P1030466

….and here it is again, in its previous incarnation, as a Christmas gift box.

P1030469

The basis is the same. A simple box, made from a 6” piece of card, fastened with seam binding. A change of colour scheme and decoration was all that I needed.

P1030464

This wedding card is a mash up of these two birthday cards, with punched and embossed butterflies instead of hand cut stamped flowers. Adding the doily and a couple of gems, helped to make it suit the occasion.

P1030463

The final card is a design I’d made previously for Valentines Day. I swapped the red glittered hearts for a champagne colour and changed the sentiment. Used the same background stamp, ink and cardstock as I did for the little box with the flower. That gave me a set of three projects to fit my wedding theme for the session.

If I had to start completely from scratch each time, I’d just give myself a headache. I begin with a theme or a colour scheme and then go through my Picasa gallery, of cards and gift boxes, to see what I can adapt. The project evolves as I go along and often the end result bears little resemblance to the starting point. Some of the time it will depend on what happens to be left out on my desk!

Do you have tried and tested designs that you adapt and use again?

Wednesday, 2 April 2014

What’s On Your Workdesk Wednesday? #252

A mess! This is the result of Hurricane Fiona passing through. Packing up for class this morning, in a big rush.

P1030413

Mainly leftovers of the projects from the last couple of classes I’ve done. I bring all the card/paper scraps home with me, so that I can put them in our recycling bin, rather than the mixed rubbish bin available to me at the venue. Obviously they didn’t make it to the bin last time and I emptied the container onto my desk ready to refill.

Moving swiftly on….

P1030414

….here’s what we made today. A flower garland card and matching gift box*. Just in time for Easter, but equally useful for a Spring birthday.

Keeping it short today. Those boxes need unpacking again and my little cherubs will be bursting through the front door at any moment. Join the fun at Julia’s place.

*If you fancy making a gift box like this one, there’s a tutorial here.

Friday, 14 February 2014

Hearts and Flowers

Happy Valentine’s Day! Today seemed like a good day to share the next few cards made for the 52 Card Challenge. There has been absolutely no let up from the rain since I got up this morning. A day for baking biscuits and snuggling up in the warm.

Week 3 was a sketch challenge. I tinkered with it a bit, but kept it simple.

P1030387

I cut the mat to fit the card front, rather than leaving a space at the bottom for the sentiment. I stuck with a flower motif for my first card, but I didn’t want it floating in that large white space so I put a square of paper underneath and added the sentiment there as well. The design was easily adapted for a quick Valentine.

Week 4 was a photo prompt and there was plenty of inspiration here.

P1030382

I went for a kraft and white base with a pop of bright colour. Also taking inspiration from the wooden table and doily underneath those beautifully iced biscuits.

P1030381

I made a second “Just because” card in peachy tones. I think there will be a few more of these, in other colours, coming soon!

Week 5 was a selection of words picked from Nat’s prompt jar.

P1030368

I went back to an old favourite for the scripty background. Chose pale pink and ivory as my colour scheme and framed the letters with some champagne glitter card. I also made a simple box to match and these were our projects in class last week.

I’ve set up a Pinterest board with all the prompts and my own takes on each…..so far. It’s a great way to build up a little stock of cards for whenever you might need one. There is a second part to the challenge, which encourages everyone to make a Christmas card for each prompt, but it’s far too early for me to be starting that. I will refer back to the board when the time comes though and I’m sure it will be helpful.