The first December ‘how to’ is for the gift box I shared on Tuesday.

Start with a piece of cardstock measuring 8” x 5 1/2”.

Score at 1 1/2”, 3 1/4”, 4 3/4” and 6 1/2”.

Turn and score at 1 1/2” and 4”.

Cut along the lines shown in red.

Cut from corner to corner on four panels, as shown. Cut a strip from the tabs on one side. It makes the box go together better and you only need glue on one set of tabs.

Make the handles by punching out ovals and rounding the corners of the middle sections on each side. Use a bone folder to burnish all the score lines.

Flip the card over and add a narrow line of glue along the edge of the left hand tabs.

Bring up the two middle tabs.
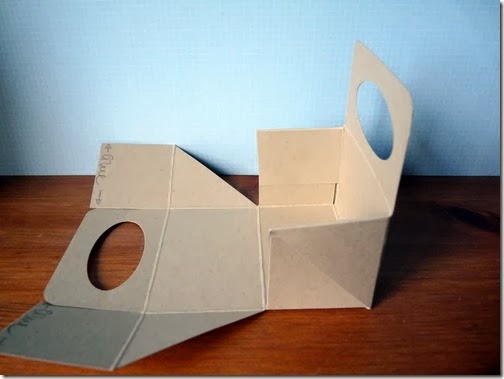
Bring the right hand side of the box up towards the middle and fold the tabs inside.

Do the same with the left hand side and pinch the sides so that the tabs (with the glue on) adhere firmly. That’s it. You’re done with the construction. Decorate the box as you like and tie the handles together with ribbon, once you’ve filled it.

I added a stamped panel to mine, to match the card it would be given with. You could stamp a design onto the cardstock before you score and cut it or use heavy weight patterned paper to construct the box. Lots of possibilities for decorating.
PS That cute little tree in the first photo? It came all the way from Nashville and I’ll tell you about it on Monday.


