Friday, 17 January 2014

Peachy Keen

As I mentioned on Wednesday, I’m taking part in the 52 Card Challenge again. I was a bit hit and miss with it last year and thought by posting what I’ve made here, every now and again, I might be more inclined to keep up this time around!

P1030344

The first challenge was to use stash you’d been given for Christmas. In my case, that was none! Instead I went for something new(ish) that I’d bought myself, the smaller of the two flower stamps. The larger one is an old favourite and both have matching punches, which makes things easy. Inspired by the peachy tones Alexa chose for her Friendship Quilt blocks, I made this card and a coordinating box*.

P1030353

Last week, the challenge was to use a very bright colour palette, with many more colours than I would usually put together in one card. I managed to get them all in, albeit in very small doses, including a nod to the spots and chevrons in the picture.

This week it’s a sketch challenge, if you fancy joining in. I’ve yet to make mine, but I’ll share it, along with Week 4, later in the month. Here’s to keeping up with good intentions….so far!

*You can find a tutorial for the box (in a slightly smaller size) here.

Wednesday, 15 January 2014

What’s On Your Workdesk Wednesday? #241

Here’s *what* is on my desk…..

P1030351

…..but the bigger question this week is: *Where* is your workdesk?

P1030350

Look, look! Tucked into a corner, beside a big bookcase, in front of the cupboard of doom (well, I didn’t want to get in there anyway!) my little desk is back. It’s not ideal. There’s only just room to get my chair underneath and I have my back to the window, but I’ll take it. So happy to have a permanent space again.

Please excuse the horribly blurry photos, but it is so dark here today. If I put the lights on all the colours are very strange indeed. I made a card last week for Nat’s 52 Card Challenge and stamped some extra pennants to make into a few more. The circular thing, top right, is a Christmas decoration. I got it for 90p, in Paperchase, yesterday and will be dismantling for the multi coloured jingly bells.

That’s me. How about you? Are you joining in today? I’m about to head over to Julia’s place and find out.

Sunday, 12 January 2014

Intentions for 2014

It seems a little late in the month for a retrospective post, so bang goes my first intention for this month! Instead I’ll look forward to what the coming year may bring.

P1030348

Project Life ~ I bought a small diary to jot down things that happen each day, as a basis for some pocket scrapping. I’m really keen to give it a go this year, having read with interest the blog posts of others on the subject, over the last year or so.

Instagram ~ I upgraded my phone a couple of weeks ago and for the first time I have a camera worth using. I’ve joined Instagram and am enjoying finding my way around there. I think it will also be a useful tool for PL and possibly a good way of sharing progress with the Friendship Quilt, for those that are on there.

Reading ~ Last January I began A Song of Fire and Ice, not really intending to read all the books published so far. That’s what happened though and I have about 200 pages left of A Dance With Dragons. This year I will be catching up with all the great books I missed out on. I’ve already downloaded one or two onto my Nook.

Crafting ~ There will definitely be more sewing in my very near future. I have plans for at least one other quilt, before I receive all my Friendship Quilt blocks in June. I can’t tell you how much I’m looking forward to that. If you’re taking part, look out for a post, with some thoughts on that project, later in the week.

Blogging ~ I want to get out of the rut I found myself in at the end of the year and have some plans to that end. I also have an idea for a monthly meme, which I’ll share next week. I really hope some of you will join me.

One Little Word ~ Last year I picked ‘Connect’ and that worked well for me. This year I am choosing ‘Engage’ and I’ll talk more about that another day.

There you have it. Another fresh new year ahead of us. Let’s enjoy it together.

Thursday, 9 January 2014

One Photo in Twenty Words ~ Angel Bear

A monthly meme hosted by Abi at Creating Paper Dreams.

2014-01-05_1388950828

Our angel bear, bought the year we nearly lost our girl. Christmas, along with the memories, back in the box.

Wednesday, 8 January 2014

What’s On Your Workdesk Wednesday? #240

That’s another week gone by. Seriously? I had planned to blog in between, but it just didn’t happen. I’m teaching this morning so a very quick fly by from me.

P1030335

Kitting yesterday afternoon, ready for class this morning. My essential notebook at the forefront. Trying to gently steer myself away from what have become my signature colours. Kraft still puts in an appearance. It does go with everything, doesn’t it, or is that just me?

Pop over to Julia’s to see what everyone is up to and I’ll be round to visit after lunch.

Wednesday, 1 January 2014

What’s On Your Workdesk Wednesday? #239

It’s almost midnight. I’m watching a firework display on the TV, while listening to them being set off outside. Big Ben is chiming the last few seconds of 2013 and a brand new year is nearly here.

P1030302

There hasn’t been very much crafting going on in the last week. I did make these little gifts for my nieces and nephews, to give out at a family gathering yesterday.

P1030303-001

There was a boy’s version too. As you can see they are a little outnumbered! I found it interesting to see who tore off the end, to get to the contents (Lindt chocolate teddy bears and Santas, in case you’re interested) and who carefully untied the ribbon and tipped it out.

I’m joining in with Julia and the gang for this New Year edition of WOYWW?

Thank you to everyone who has visited and commented during this last year. Looking forward to your company in 2014, whatever it may bring. Happy New Year!

Saturday, 14 December 2013

Christmas Tutorials ~ Gift Card Holder

Today I’m bringing you the second in my mini series of festive tutorials, as part of a “Project a Day” that UKS are running on the Homepage this month. There have been a wide variety of lovely items and plenty more to come. Why not check it out, if you haven’t already. All the projects shared so far can be found here.

Have you ever had to pick up a gift card at the supermarket as a last minute gift? Wouldn’t it be nice to pretty it up a bit before giving. Well, here’s how to do just that.

P1030265

You’ll need cardstock, patterned paper, ribbon, a circle punch and a greeting stamp.

P1030289

Cut a piece of cardstock measuring 10 3/4” x 4”. Score at 2 3/4”, 4”, 5 1/4” & 8 1/8”.

P1030291

Fold the 1st, 3rd and 4th score lines in one direction and the 2nd the other way. The photo above shows the inside of your gift card holder.

P1030292

Flip over (top to bottom *not* left to right) so that the outside is uppermost. Cut a piece of patterned paper 4” x 2 3/4” and adhere to the left hand panel. Put double sided tape just to the right of the 1st score line, as shown. Round the corners of the right hand panel, punch out a circle* and stamp your greeting.

P1030293

Remove the tape liner and bring the folds together. This will form the section where the gift card will be held.

P1030295

Flip back to the inside and mark the width of your gift card in pencil.

P1030299

Centre your punch and punch approx 1/4” from the folded edge. Slide the punch to the right (up to your pencil mark) and punch again. Do the same to the left.

P1030296

I used a slot punch for mine as it gives nicely rounded corners, but it also works with a square, as shown in the previous picture. Insert your gift card.
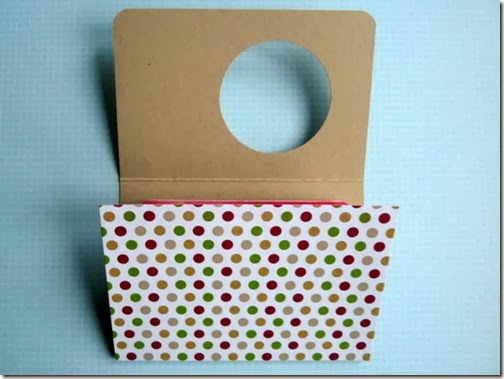
P1030297

Fold the bottom up….

P1030298

….and the top down. Wrap a piece of ribbon around the card and tie in a bow. I positioned the bow at the top of the circle, to give it the look of a bauble.

Here are some others I made previously, for a couple of birthday girls. Instead of simply rounding the corners on the front flap, I used a scallop punch. Mine is a Fiskars one and punches quite deep, so in this instance I cut the card at 11” long. As you can see, it’s easily adapted to the occasion and supplies you have.

*I used a 1 3/4” circle punch, but other sizes will work. Alternatively you could use a wafer thin die, such as a Spellbinder circle, if you prefer.

PS If you don’t have a suitable punch for cutting the gift card slot, then you might like this previous gift card holder tutorial I wrote.