Wednesday, 16 July 2014

What’s On Your Workdesk Wednesday #267

Good morning. Here we are again, taking a tour around the world by craft desk.

P1030525

The usual Tuesday kitting session in progress at the kitchen table. Where else? I took this just before clearing away. The children were due to arrive home from school at any moment. Today we are making one of the ever popular “Card in a Box” designs and a shaker card, which is new to me, but I think I cracked it.

The sun is shining and I’m about to load up my little Clio. Catch you all later, round at Julia’s place. Put the kettle on and I’ll bring the biscuits.

PS If you want see what those bits of fabric, I was cutting last week, turned into, then check out this post.

Tuesday, 15 July 2014

Time for a Recipe Tuesday ~ Cornish Fairings

Otherwise known as the easiest and quickest ginger biscuit you’ll ever make.

IMG_20140622_185627

Fancy a biscuit with your cuppa, but the tin is empty. Only got twenty minutes to spare? That’s plenty of time to make these simple biscuits.

This recipe is from the collection in my very old exercise book, hence the ounces.

Cornish Fairings

3 oz butter or margarine

1 tbsp golden syrup

3 oz sugar

6 oz self raising flour

1/4 tsp bicarbonate of soda

2 tsp ground ginger

Preheat the oven to 190 and grease a baking sheet.

Melt the butter/marg and syrup, in a pan, over a low heat.

Stir in the sugar, followed by the rest of the ingredients.

Put spoonfuls of the mixture onto the baking sheet.

Flatten slightly and place in the oven for 12-15 minutes.

Leave to cool and firm up a bit before removing to a cooling rack.

You’re done.

The mixture is quite stiff but don’t worry about that. It makes 16 biscuits. I like mine to be good and gingery, but you can halve the amount of spice, if you prefer. Enjoy.

It’s the perfect recipe, if you want to bake, but don’t have any eggs in the cupboard. Does that just happen to me? Would love to know, if you make them.

I’ll be back tomorrow with my desk, as is the custom around here on Wednesdays.

Sunday, 13 July 2014

Shop Your Stash

I’m back with my second Sunday Stash post. Thanks to those lovely people that took the time to comment on my first outing and make me feel so welcome.

20140713_184512

As I mentioned last time, I’ve taken a pledge not to buy any more dressmaking fabric, until I’ve made three garments. I’ve almost finished my Lonsdale dress and an A line skirt. In the interests of moving things along, I shopped my stash today to find some fabric for a pair of PJ bottoms. This came from Fabricland last year. I had planned to self draft a pattern from a favourite pair, but I picked this Butterick pattern up in a sale last month so I’ll use that as my starting point and work from there.

20140713_185109

The fabric above was purchased to make the A line skirt. I bought 1.5 metres, which is what it said on the pattern envelope, but cut it out from less than a metre. I’m not very tall! I’ve already used a fair bit of the leftovers to cut hexies for Grandmother’s Flower Garden blocks and rectangles for the tissue holders in Friday’s tutorial. I can just squeeze out a pair of PJ shorts, using the same pattern, for my daughter.

Fabric shopping is fun and I’ll never grow tired of it, but sometimes you have everything you need on hand already, which is quite satisfying.

Have you ‘shopped your stash’ for a project this week or bought something new?

Friday, 11 July 2014

A Friendship Quilt ~ The Leftovers {a tutorial}

So, you joined a Friendship Quilt square exchange. You bought way too many a few fat quarters and now that the project is almost three quarters of the way through, you realise that you have rather a lot of a little leftover fabric. What to do with it?

IMG_20140709_141934

Enter the tissue holder. A very simple beginner sewing project. A great way to practise 1/4” seams. OK, it’s a bit late for that one, if you’re a Friendship Quilter. A last minute teacher gift or Summer Fayre fund raiser. A useful project from scraps.

I’d seen a few tutorials online, using the same fabric inside and out and then I saw these with a contrast binding at the opening. I pinned it for future reference, but when I looked at the instructions, it seemed like a lot of work for such a small project. I thought, ‘There must be an easier way.’ Do you know what? There is.

P1030520

You’ll need a 5 1/2” x 7 1/2” rectangle of your inner (plain) fabric and 5 1/2” x 6 1/2” in the outer (printed) fabric. No need to cut a paper pattern. I just used my rotary cutter, but forgot to take a picture of the fabric pieces before I sewed them together.
P1030513

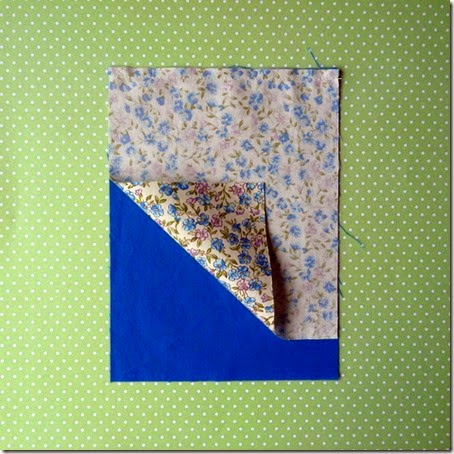
Place the rectangles, right sides together, matching along one of the short edges. Sew a 1/4” seam. It doesn’t really show up here, but I’ve turned it over for the next picture. I matched my thread to the lighter fabric.

P1030514

Now line up the other short edges and stitch another 1/4” seam.  As you can see the lining will bulge. Don’t worry, that’s how it’s supposed to look. The plain fabric is longer so that it shows on the outside to give a contrast trim. Turn right side out.

P1030515

Centre the outer (print) fabric to give yourself a narrow border (approx. 1/4”) of the lining (plain) fabric on each side, as shown in the top example. Turn over. Press with the iron on the reverse so that it’s nice and smooth, as pictured at the bottom.

P1030516

Fold in half by bringing the two borders together. Finger press at the top and bottom of the fold to mark the centre point. Unfold. No matter how hard I tried, I couldn’t get those little creases in the centre to show up, but trust me they *are* there.

P1030518

Bring the right hand side in to the centre mark and the left hand side to meet it. I didn’t actually pin my own, but this is the best place to put them so you can sew both ends, without having to remove the pins. Sew a 1/4” seam across each end.

P1030519

Turn right side out. Push the corners out with a chopstick, or similar pointy stick. I like to take the tissues out of the cellophane before putting inside, but if you’re making these as a fund raiser you might prefer to leave them sealed. Try not to get too carried away, once you realise how easy they are to make!

P1030524

I made these from my leftover floral skirt fabric and some plain blue cotton I had in my stash. If you’re cutting from a fat quarter and the long edge (22”) is intact you can get four out by cutting a 6 1/2” strip (outer) or 7 1/2” strip (inner) and then chopping into four 5 1/2” pieces.

I’ve never written a sewing tutorial before so if anything is unclear please shout and I’ll be glad to help, if I can. Happy sewing.

ETA Some of the photos show both sides of the project, or two stages, at once. I did this to avoid the post being too photo heavy. I had two sets of fabric pieces, to illustrate the different steps, which you won’t necessarily. Apologies for the confusion caused.

Thursday, 10 July 2014

One Photo in Twenty Words ~ Rainbow

Joining in with the lovely Abi, of Creating Paper Dreams, today.

IMG_20140708_195754

Up above the streets and houses, rainbow climbing high….

What can I say? I am a child of the seventies.

If you are too young to remember it, or didn’t grow up in the UK. Here’s what you missed.

That little project I was working on yesterday? I finished it. Yes, you read that right. I even remembered to photograph the stages as I went along. I’ll be back tomorrow with a tutorial, for using up fabric scraps, to make a quick gift.

PS Got that song in your head now? You’re welcome.

Wednesday, 9 July 2014

What’s On Your Workdesk Wednesday? #266

It’s that time of the week when we all gather at Julia’s place to see what’s what in the world of work spaces. There’s always lots of inspiration to be found. Why not take a look?

P1030511

I’ve been at the kitchen table again. Cutting out pieces of fabric, left over from my skirt, for a little project I want to try. Yes, I know what you’re thinking. How many others does she have on the go? A few, but they are all progressing….slowly.

P1030512

Here’s my actual workdesk. Nothing to see here. Moving swiftly on….

IMG_20140706_163654

….to what I was cutting out on Sunday afternoon. I had a big sort out of old clothes. My jeans collection is growing steadily and I’ll soon have enough to start that quilt top. This pair has a fairly high polyester content so I decided I didn’t want to include them. Instead I’ve cut out the pieces to make a bag and I’ve got an old duvet cover to cut the lining from. My sewing machine will be busy this afternoon, but I’ll find time to stop by and say, “Hi!” if you’re sharing your desk/table/floor today.

Monday, 7 July 2014

Me On Monday

Sian started this little peek into her weekend, back in May I think, and I’m jumping on board today.

IMG_20140707_121053

This is me on Monday, in my new Converse and very old jeans, admiring the daisies, having hung out the washing. As you can see from this shot, whatever else was happening this weekend, there was not much mowing going on around here!

2014-07-07

It was a Saturday working, Birthday card making, scrapbook page finishing (yes really!), new shoe wearing, Mad Men watching, whole night sleeping (hooray for that one), old clothes sorting, mackerel pate spreading, jeans unpicking, denim recycling, shower dodging, washing rescuing, Smite playing, character animating, affogato enjoying and definitely no grass cutting sort of weekend.

How was yours? I’m off to scoff some more of that pate. Perfect on a nice thick oatcake. If you’d like to try it, you can find the recipe here. These days I just go with the creme fraiche, leaving the cottage cheese out altogether and my lemon juice has been known to come out of a bottle. It’s still good.